
Your old furniture doesn’t have to end up in a landfill. And you don’t need to spend a fortune on new pieces either. This article shows you practical ways to turn tired furniture into something fresh and useful for your home.
We’ll walk you through simple upcycling projects that actually work. You’ll find step-by-step ideas for updating dressers, chairs, tables, and more into pieces you’ll be proud to show off.
These aren’t complicated projects that require special skills. They’re real solutions for real people who want to save money and reduce waste.
I’ve spent years testing different upcycling methods and learning what works best. The ideas here come from hands-on experience, not just theory.
If you’re dealing with scratched wood, outdated styles, or furniture that’s lost its appeal, you’ll learn proven techniques to make it beautiful again.
Tools and Materials for Upcycling Furniture
You don’t need a fancy workshop to start upcycling. Most projects require basic supplies you might already have at home.
I’m going to show you exactly what to grab so you’re not wasting money on things you won’t use.
- Basic Tools: Sandpaper, paintbrushes, sponges, and rags handle the main work. Add screwdrivers, hammers, screws, and nails for assembly and repairs. Most of these essentials cost under $20 total if you’re starting from scratch.
- Paints & Finishes: Chalk paint, milk paint, or regular latex paint. Update your furniture’s appearance. Protect your work with wax for a soft finish, or use varnish and polyurethane for durability. Wood stain enhances natural grain when you don’t want full coverage.
- Unique Materials: Scrap wood, old trays, tin, glass, and fabric scraps add texture and unique details. Repurposed hardware like vintage knobs, glass pulls, or leather straps makes pieces look custom. These extras improve projects from basic to impressive without breaking your budget.
Budget-Friendly Upcycled Furniture Ideas
Upcycling doesn’t require a big budget. In fact, that’s the whole point: creating beautiful pieces without spending much money.
I’m going to show you where to find cheap furniture and how to keep costs down. You’ll be amazed at what’s possible for under $50.
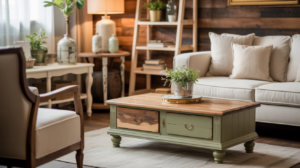
Painted Thrift Store Dresser
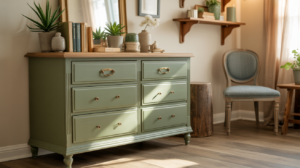
Solid wood dressers from thrift stores make perfect first projects. You’ll find pieces for $20-40 that just need new paint and hardware.
How to create this look:
- Find a solid wood dresser at a thrift store and check that the drawers slide smoothly and the legs are stable
- Sand the surface lightly, then apply two coats of “oops” paint from the hardware store ($5-10)
- Replace old knobs with new hardware from a home improvement store ($15-20 for a set)
Run your hand along surfaces to feel for solid wood versus laminate—solid wood feels warmer and shows grain patterns. This project typically costs under $50 total and gives you a completely refreshed piece.
Reupholstered Dining Chairs
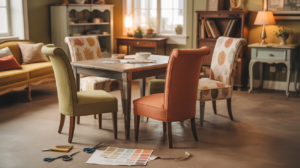
Wooden chairs with worn seats are perfect for practicing basic reupholstery. Look for chairs with good frames but outdated fabric.
How to create this look:
- Buy wooden chairs at a thrift store for $5-10 each and remove the old seat cushion
- Cut new foam to size ($8 per yard) and wrap it with leftover fabric or clearance material
- Staple the new fabric to the underside of the seat using a staple gun and reattach it to the chair
The chair frame stays the same while the seat gets completely made over. You can mix and match fabric patterns for an eclectic look or keep them all matching.
Old Door Headboard
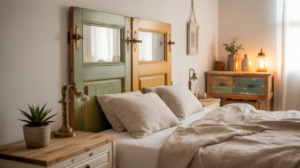
Turn an old door into a rustic headboard for your bedroom. Vintage doors have a character that new furniture can’t match.
How to create this look:
- Find an old door at a salvage yard or ask neighbors doing renovations (often free)
- Sand it down and paint or stain it in your chosen color, letting some wood show through for character
- Mount it to the wall behind your bed using heavy-duty brackets, or lean it against the wall
Old doors become statement pieces that cost almost nothing. The weathered look adds charm, and you don’t need to hide imperfections, they add to the style.
Stacked Suitcase Side Table

Vintage suitcases stack into quirky side tables or nightstands. This project requires no tools and takes just minutes.
How to create this look:
- Collect 2-3 vintage suitcases from thrift stores in similar colors or complementary patterns
- Stack them from largest on the bottom to smallest on the top, and secure with a strong adhesive or small brackets
- Add stick-on furniture pads to the bottom to protect your floor
The inside of the suitcases still opens for hidden storage. This works great in bedrooms, living rooms, or entryways where you need extra surface space.
Ladder Shelf Display
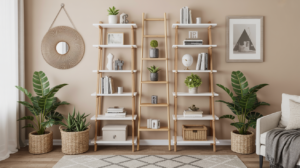
Old wooden ladders become leaning shelves with zero carpentry skills needed. Look for sturdy ladders at yard sales.
How to create this look:
- Find an old wooden ladder and clean it thoroughly, then sand any rough spots
- Paint or stain the ladder in your preferred color and let it dry completely
- Lean it against a wall at an angle and use the rungs to display plants, books, or folded towels
This works especially well in bathrooms for towel storage or in living rooms as a plant stand. The angled design takes up less floor space than traditional shelving.
Dresser-to-TV Stand Makeover
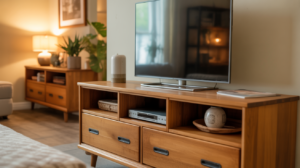
Remove the top drawers from an old dresser to create the perfect TV stand with built-in storage below.
How to create this look:
- Find a solid wood dresser and remove the top 1-2 drawers, keeping the drawer fronts
- Paint the entire piece and drill holes in the back for cord management
- Reattach the drawer fronts as false fronts with hinges to create cabinet doors for hiding electronics
The remaining lower drawers provide real storage for movies, games, or remotes. This gives you a custom media console for a fraction of retail prices.
Cabinet Door Images Frames
Old cabinet doors with interesting details make unique image frames or memo boards for almost no cost.
How to create this look:
- Collect old cabinet doors from renovation projects or Habitat for restoration (usually free or under $5)
- Remove the center panel and paint the frame in a bold color
- Add chicken wire, corkboard, or glass to the opening and hang images with small clips
These work great as kitchen memo boards or as gallery wall pieces. The architectural details of old cabinets add visual interest that plain frames don’t have.
Crate Storage Solutions
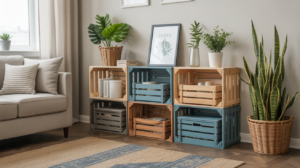
Wooden crates from craft stores or farms stack into endless storage options. They’re cheap and need minimal work.
How to create this look:
- Buy or find 4-6 wooden crates and sand them to remove splinters
- Stain or paint them in colors that match your room
- Stack them on their sides in different configurations and secure them together with wood screws
Use them as bookshelves, toy storage, or display shelves. You can reconfigure them anytime by unstacking and restacking in new patterns.
Painted File Cabinet
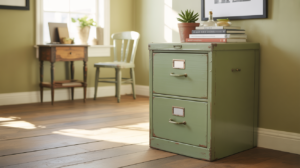
Metal file cabinets from offices get beautiful makeovers with the right paint. Look for them at office liquidation sales.
How to create this look:
- Find a metal file cabinet for $10-20 and clean it with degreaser
- Apply metal primer and then 2 coats of spray paint in a fun color
- Add new label holders or paint them to match
These become stylish storage in home offices, craft rooms, or bedrooms. The file system inside still works well for organizing papers, craft supplies, or clothes.
Window Frame Mirror or Art Display
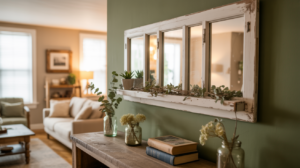
Old window frames with multiple panes create charming mirrors or image displays with farmhouse appeal.
How to create this look:
- Find an old multi-pane window at a salvage yard and remove any remaining glass carefully
- Paint or distress the frame to match your decor style
- Add mirrors cut to fit each pane opening, or use the openings to display family images
Hang it in an entryway, bathroom, or bedroom. The divided panes create interest that a regular mirror doesn’t provide, and it costs under $30 to complete.
Bookshelf-to-Bench Conversion
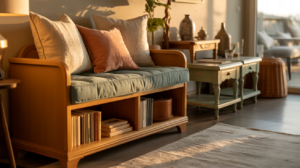
Turn a short bookshelf on its side to create a functional entry bench with storage cubbies built right in.
How to create this look:
- Find a sturdy bookshelf about 14-18 inches deep and lay it on its back/side
- Paint the entire piece and add a cushion on top made from foam and fabric
- Use the shelf compartments below for shoe storage or basket organization
This creates seating and storage in one piece. Add hooks above it for coats, and you’ve got a complete entryway station for under $40.
Common Mistakes and How to Avoid Them
Everyone messes up their first few projects. I’ve ruined pieces by going too hard too fast. The good news? Most mistakes are fixable, and knowing what to watch for saves you major headaches. Let me help you dodge the most common problems.
- Over-Sanding Damage: Sand with light, even pressure, and check your progress frequently to avoid stripping through veneer or creating deep gouges. If you damage the surface, fill small spots with wood filler, let it dry completely, then sand smooth and continue carefully.
- Uneven Paint Application: Always apply thin coats instead of one thick layer, letting each coat dry 2-4 hours before adding the next. If you get streaks or drips, lightly sand them down once dry and apply another thin coat for a smooth finish.
- Wrong Product Combinations: Water-based paint over oil-based finishes won’t stick without primer, causing peeling and frustration. When in doubt, use a bonding primer first to create a surface that accepts any paint type.
- Skipping Protective Sealing: Your beautiful paint job won’t last without a top coat of wax, polyurethane, or varnish to prevent chips and stains. Apply at least two coats of sealer, waiting between applications, especially on high-use pieces like tables and chairs.
- Quick Mid-Project Fixes: Wrong paint color can be sanded down and repainted, annoying but totally fixable. Paint won’t stick means you skipped cleaning or priming, so strip it, clean thoroughly with TSP or degreaser, prime properly, then repaint for success.
Conclusion
You’ve now got a solid collection of upcycled furniture ideas that won’t empty your wallet. From painting old dressers to repurposing wooden pallets, these projects prove you don’t need to buy new to create a home you love. Each technique we covered works with basic supplies and a little patience.
The beauty of upcycling is that you’re not just saving money. You’re creating one-of-a-kind pieces with real character. Your furniture will have stories, not just price tags.
Ready to get started? Pick one project that speaks to you and dive in this weekend. Don’t worry about making it perfect. The charm is in the handmade details. And when you finish your first piece, I’d love to hear about it. Drop a comment below and share what you created. Your experience might inspire someone else to leap.
Frequently asked questions
What is upcycled furniture?
Upcycled furniture is when you update old or unwanted pieces into something new and functional. Instead of throwing furniture away, you give it a fresh purpose through unique updates like painting, reupholstering, or repurposing. It’s different from recycling because you’re improving the item rather than breaking it down.
Is upcycling furniture cheaper than buying new?
Yes, upcycling is usually much cheaper. You can find affordable pieces at thrift stores, garage sales, or even use furniture you already own. Basic supplies like paint and hardware cost far less than new furniture. Plus, you create custom pieces that match your style, well-distressed.
What furniture is easiest to upcycle for beginners?
Start with simple wooden pieces like chairs, side tables, or dressers. These are forgiving and easy to sand and paint. Avoid upholstered furniture or complex pieces with lots of hardware until you gain confidence. Small projects help you learn techniques without feeling overwhelmed.
What tools do I need for upcycled furniture ideas?
You need basic supplies: sandpaper, paint or stain, brushes, and a screwdriver. Optional tools include an electric sander, wood filler, and new hardware. Most upcycled furniture ideas work with simple hand tools you might already have at home.
How long does an upcycled furniture project take?
Simple projects like painting a chair take a few hours plus drying time. Larger pieces like dressers might need a weekend. The timeline depends on prep work, how many coats you apply, and drying time between steps. Most projects finish within one to three days.
Leave a Reply